top of page
WORTHING CHESS CLUB
ARTICLES
-
Double Attacks in Chess
By John Knott
In military campaigns a pincer movement, involving attacking an enemy army in two places simultaneously, often with the idea of surrounding it, has an approximate equivalent in chess, where it is known as a double attack. Reuben Fine (1914-1993), one of the strongest players in the world during the 1930s and 1940s, and who was phenomenally successful in ten-seconds-a-move simultaneous games played blindfold, stressed the importance of double attacks as a strategy to gain an advantage in chess. A double attack can take many forms and can use either one piece, when it is usually termed a fork; or two (or possibly more) pieces, when it includes one or more discovered attacks. It could, theoretically, use up to five pieces (an example is given later), but that would be highly improbable in a game.
The most common form of double attack is a fork, which can be achieved by any of the pieces including pawns and even the king, but is most frequently carried out by a knight. This happens when a piece is moved to a square from which it attacks two or more pieces directly. The move may include a check by the moving piece, or by a piece which the move uncovers (when the manoeuvre is called a discovered check). A recent fine example of forks, illustrating the power of the knight and bishop, occurred in Dave Graham's last game for the Club, in the match against Hastings and St Leonards. In the game, the following position was reached:

D. Graham v F. Rayner
Position after 17....exd5
Dave had earlier sacrificed the exchange for the initiative, and in particular for pressure on the long white diagonal. Play continued 18.Nf5!, which created three sets of double attacks. First, there are now two pieces attacking Black's pawn at d5, which White's light-squared bishop pins against the Black queen and the rook in the corner. (Note that, in the event of, for example, 18....Bf6, 19.Bxd5, White has to consider the effect of a possible cross-pin by 19....Rf8-d8). Secondly, from f5 the knight is attacking Black's bishop and also the vulnerable g7-pawn, defended only by Black's king. The significance of the pressure on the g7-pawn is that White's queen can easily add to the attack from either d4 or, in some circumstances, g4. Thirdly, White's knight is adding force to the attack by the rook on Black's bishop, which is defended only by Black's queen. That is a lot to achieve with one move.
In the game, Black played 18....Bb4, attacking White's rook. The principle of counter-attacking is often a good one, but the fact that not only Black's bishop but also the g7-pawn were under attack suggests that Black's best response would have been 18....Bf6, which would also have guarded the d4-square from invasion by White's queen. White correctly ignored the attack on his rook and played the powerful 19.Qd4, threatening mate in one move. This is even stronger than 19.Qg4 Bc3, 20.Bxd5, which also wins, by reason of a potential knight fork at e7.

D. Graham v F. Rayner
Position after 19.Qd4!
The move 19.Qd4 also forms a double attack because, as it happens, from d4 the White queen is also attacking Black's bishop. By chance, the bishop is defended by Black's queen; but otherwise, and in different circumstances, that threat could have been a key reason for White's move. Black recognised that the threat of mate was so powerful that he resigned. There are only two moves that could slow down the threat: (A) 19....f6, blocking White's queen, and (B) 19....Bc3, acting on the long black diagonal. But both of these would have been only temporary measures.
In the event of 19....f6, play would have continued 20.Bxd5+. This is a powerful fork, and another example of a double attack, as the bishop is also threatening Black's queen, which was drawn to the b7-square when White sacrificed the exchange a few moves earlier. Now, whether Black captures the bishop (which will be replaced by White's queen, creating yet another double attack); or moves his king to h8; or blocks the check with his rook; Black will not survive for long, as readers can work out for themselves.
And if Black, instead of playing f7-f6 were to move 19....Bc3, play would have continued 20.Qxc3 f6, 21.Bxd5!+ (yes - it is another double attack) when this time Black could capture the bishop by ....Qxd5 only to fall victim to a double attack by White's knight, 22.Ne7+. After that, Black would be left with a pieces deficit of a rook against White's queen and bishop.

D. Graham v F. Rayner
Position after 22.Ne7+
in possible continuation
The complete game, with notes by the winner, appears in the Teams section of this website, after Russell's Pre-Christmas Report 2025 on our First Team's performance in the Sussex League.
Another recent example of a devastating double attack by a Club member occurred in the Under-12 section of the 2025 British Championships, in a fine game played by Sidhanth Pai. The game started as a closed Sicilian Defence, where Sidhanth had the Black pieces. The following diagram shows that after thirty moves Black had an extra pawn and had outplayed his opponent, allowing the centralised knight, and rook on the second rank, to dominate the position. The opponent, faced with an attack on his b3-pawn, has unwisely just moved his rook from d1 to b1. In doing so, the opponent failed to consider the geometry of the position, and left himself open to a double attack. Can you see what he missed?

C. Samuel v S. Pai
Position after 31.R(d1)-b1
Here, there are not many pieces left on the board, so the key features should stand out. Sidhanth spotted that if the Black rook and the White bishop were missing, he would be able to win another pawn. Accordingly, he played 31....Rxg2! when, after 32.Kxg2, he had available a double attack by 32....Bxe4+ followed by capturing White's rook on b1. You can find the whole game in the article Our Future British Champion? earlier in this section.
So far, we have seen several examples of double attacks by knights and bishops, and one by a queen. Another example of a double attack, this time by a pawn, is described in some comments on the Vienna Opening at the end of the recent article about Russell's win in the team match against Crowborough. It occurs in this position:

Position after 3.Bc4 in the Vienna Opening
Here, Black has the possibility of capturing the e-pawn with his knight when, in the event of White capturing the knight (there is another option, as described in that article), he can recover a piece by the move d7-d5, forking White's knight and bishop. Double attacks by rooks and kings are also possible, although these are less common and occur mainly in the endgame.

White to move.
Several multiple attacks are available.
This fantasy position illustrates some of the many ways in which double and multiple attacks occur.
How many can you identify?
Among the most powerful double attacks are those that involve a check, because that is something that the opponent must deal with, leaving him less flexibility in coping with the other consequences of a move. In a double attack a direct check may be given by the piece that has moved, or there may be a discovered check, given by a piece that the moving piece has uncovered. In principle, to respond to a check a player may, depending on the exact position, have three choices: capturing the attacking piece; blocking the attack by interposing a piece; or moving the king. Of course, in many positions, not all of these options are available. And where check is given by a knight, it is not possible to interpose a piece; which is one of the reasons why knight checks can be so effective. The most dangerous form of double attack is where the moving piece and an uncovered piece each give check. In that situation, a double check forces the opposing king to move, as it is not possible to respond with any other type of move.
This brief survey of double attacks, occurring in a wide range of situations, should alert you to their potential power and usefulness, and may help you to make use of them for your benefit while avoiding those planned by an opponent.
JK / 10.02.26
-
Dynamics of King Pawn Openings
By John Knott
Attitudes towards individual chess openings tend to change over the years, often as the result of particular lines being adopted by well-known players, as for example Kramnik's successful reliance on the Berlin Defence to the Ruy Lopez (also known as the Spanish Game) in his match against Kasparov in the year 2000. Previously, after 1.e4 e5, 2.Nf3 Nc6, 3.Bb5, in modern times Black nearly always continued with 3.... a6, but Kramnik resurrected 3.... Nf6. The move had been analysed extensively in the mid-1800s and was used in the late Victorian era by Zukertort, Lasker and Tarrasch among others, but it had subsequently been considered to lead to a hopelessly passive position.

Berlin Defence, after 3....Nf6
Nowadays, however, the Berlin Defence has been adopted by many top grandmasters including Carlsen and, as a result of tournament praxis and computer analysis, is regarded as a sound way of meeting the Ruy Lopez. It is particularly suited to players who prefer a solid and slower type of game or who are meeting a very strong opponent. (See, for example, our 2024 article Russell Granat: Strategic Magician, for Russell's successful adoption of the Berlin Defence in a game against GM Michael Adams, many times British Champion and at one time rated third in the world.)
In replying to 1.e4 with the symmetrical ...e5, a player with the Black pieces must be prepared to meet not just the Ruy Lopez but also a host of other lines. These include the Scotch Game; systems where White's king's bishop is developed to c4, as in the Italian Game; and also several swash-buckling openings from the Romantic era including the Centre Gambit, the Danish Gambit, and the Vienna Gambit. Moreover, there is also the venerable King's Gambit, known from at least the 15th century, with its multitude of exotic variations including the Kieseritzky Gambit, the Muzio Gambit and the Ghulam-Kassim Gambit. Such adventurous lines are not often played nowadays because, with improved defensive techniques, opponents are not as cooperative as they were in former days. Nevertheless, enterprising players sometimes employ them in selected encounters, particularly in rapid or blitz games, when they are likely to have surprise value.
Among other ways of meeting White's opening move 1.e4, currently the most popular is the Sicilian Defence, initiated by 1.... c5. There is a vast amount of theory on the Sicilian Defence, and whole books have been written on sub-variations of the main lines. The Sicilian has many faces, but probably the most common position reached early in this Defence is after the moves 1.e4 c5, 2.Nf3 d6, 3.d4 cxd4, 4.Nxd4 Nf6, 5.Nc3 (see diagram), when Black has a choice between four main systems, namely (A) 5....a6 (the Najdorf), (B) 5....Nc6 (the Classical), (C) 5....e6 (the Scheveningen), and (D) 5....g6 (the Dragon). Also possible is the quite rare 5....e5, which may transpose into the Sveshnikov or the Kalashnikov variations. After 5.... e5, the Venice Attack starts with 6.Bb5+.
A common position in the Sicilian Defence after 5.N(b1)-c3
There are also many early variants and deviations for both sides, including a number of so-called anti-Sicilian lines of which perhaps the Rossolimo Attack (reached after 2.... Nc6, 3.Bb5) is now the most prominent. The Sicilian is the prime counter-attacking response to 1.e4, often leading to tactical opportunities for both sides, and for that reason attracts some players but does not suit players looking for a quieter and more strategic type of game.
Those players will probably be happier with either the French Defence or the Caro-Kann Defence, which can both be regarded as strong-point defences in which Black seeks to maintain a central pawn on the fifth rank. There are also less strategically sound, and therefore riskier, responses such as the Pirc Defence (1.... d6 and 2.... Nf6), the Modern Defence (1.... g6), the Scandinavian Defence (1.... d5), the Nimzowitsch Defence (1.... Nc6), and the highly provocative Alekhine's Defence (1.... Nf6), all of which may either continue in an individual way or transpose into more regular systems. The main reason for adopting any of these defences is because they are much less seen, so that a player who has devoted particular study to one of them has prospects of confusing an unprepared opponent and reaching a playable, and possibly advantageous, position.
The French Defence opens with the moves 1.e4 e6 and almost always continues with 2.d4 d5. After these moves it can be seen that White's position is more open in that he can immediately develop either bishop, whereas Black's queen's bishop is blocked by the pawn at e6. There are numerous ways in which the line may continue, a common theme being White's attempt to keep Black's position somewhat cramped, usually by advancing the e-pawn to e5; while Black will seek to counter-attack White's centre by an early ...c7-c5 and by applying further pressure against the d4-pawn in various ways. Black will also be alert for any way in which he can develop his queen's bishop, which often plays a passive role until well into the middle-game.
In the French Defence, after the initial two moves, play will generally continue with either (A) 3.exd5 (the Exchange Variation), which offers White little as on the recapture Black's queen's bishop is freed and the pawn structure is symmetrical; or (B) 3.Nc3 (the Main Line), in which Black will usually reply with 3.... Bb4 (Winawer Variation), pinning the defender of the e4-pawn, or 3.... Nf6 (Classical Variation), or by exchanging pawns; or (C) 3.Nd2 (Tarrasch Variation) avoiding a possible pin on the knight; or (D) 3.e5 (Advance Variation), often involving a later advance of the f2-pawn to f4, whereby White seeks to cramp Black's position with the hope of developing a kingside attack.
In many of the lines of the French Defence, Black is handicapped for a long time by being unable to develop his queen's bishop effectively. In contrast, the Caro-Kann is a defence where Black attempts to overcome that drawback by supporting a pawn at d5 not with his e-pawn but with his c-pawn; the standard opening moves being 1.e4 c6, 2.d4 d5. Although this position does not look greatly different from the position after two moves in the French Defence, in fact the difference between them is quite significant. The most obvious difference is that Black's queen's bishop is not blocked by a pawn at e6. Admittedly, Black's king's bishop is not yet free to move, but that can easily be remedied, either by moving the e7-pawn after the queen's bishop is developed or at g7 in a fianchetto structure. Meanwhile, however, Black will not have the option of pinning White's queen's knight if it is developed to c3. Another crucial difference is that if White exchanges pawns at d5, the resulting pawn structure, unlike in the corresponding position in the French Defence, will not be symmetrical. And if Black decides to attack the d4-pawn by a later ...c5, that will entail a loss of a tempo as his c-pawn will already have moved once.

French Defence after 2....d5

Caro-Kann Defence after 2....d5
From what can be regarded as the basic starting position in the Caro-Kann Defence (there are second move deviations for both sides, but they are of minor significance) play will generally continue in one of the following ways: (A) 3.Nc3 (the Main Line, where 3.Nd2, not blocking the c-pawn, is an alternative) 3.... dxe4 (other moves tend to transpose into an unfavourable variation of the French Defence), 4.Nxe4 and now (i) 4.... Nf6, or (ii) 4.... Nd7 followed by 5.... Ngf6 (a slower version, but avoiding possible disruption of the kingside pawns), or (iii) 4.... Bf5, 5.Ng3 Bg6. Another important option is the Advance Variation (B) 3.e5, currently popular despite the fact that it does not restrict Black's queen's bishop, as in the French Defence, and leads usually to the logical 3.... Bf5 or the paradoxical 3.... c5, attacking the d4-pawn despite loss of a tempo. There is also (C) 3.f3, a minor line, known as the Fantasy Variation, keeping the tension and seeking to maintain a double-pawn centre, sometimes involving a gambit, which can lead to some very sharp positions. (See, for example, the second game, Payne v Granat, in our 2025 article Worthing's Sussex Individual County Champions). Finally, there is the Exchange Variation, (D) 3.exd5 cxd5, when White has the choice between (i) 4.Bd3, preventing the immediate ....Bf5, and probably intending a later c2-c3, Ng1-f3-e5, and f2-f4; and (ii) 4.c4 initiating the so-called Panov-Botvinnik Attack, where White accepts the likelihood of an isolated queen's pawn in order to mobilise rapidly with chances for a kingside attack.
This was the line that featured in a recent Club game, leading to some dramatic action. The players should probably remain anonymous.
Event: Club Friendly Game
Date: 15 December 2025
Opening: Caro-Kann, Panov-Botvinnik Attack (ECO B13)
1. e4 c6
2. d4 d5
3. exd5 cxd5
4. c4 ....

Panov-Botvinnik Attack after 4.c4
The key move of the Panov-Botvinnik Attack. White seeks rapid development, good central control, and the opportunity for a kingside attack. Black's main response is 4.... Nf6, defending his d5-pawn while developing a piece. Less frequently played, but quite solid, is 4.... e6, in the style of the French Defence.
4. ... dxc4
Black gives away a tempo. If this capture were to be made after White had developed his f1-bishop to e2, or more likely d3, then the recapture would have cost White another move.
5. Bxc4 Nc6
Attacking the isolated pawn. A good idea in principle, but not in this position. Again, ...Nf6 or ....e6 was to be preferred.
6. d5! Ne5
7. Bb3 Qd6?
Supporting the e5-knight and blocking the d5-pawn. But the queen is an unsuitable blockader because she is too important for such a task and can be dislodged by any lower-value piece. Probably best would be to fianchetto the king's bishop followed by ...Ng8-f6 and castling.

Position after 7....Q(d8)-d6
8. Nc3 ....
A multi-purpose move, not just adding further support to the advanced pawn but also being able to attack the Black queen in the near future, and starting to clear the path of the a1-rook to occupy the open c-file.
8. ... Bf5
9. Ba4+ Bd7
10. Bxd7+ ....
The simplest.
10. ... Nxd7
11. Nge2 g6
12. O-O Bg7
13. Bf4 Be5
14. Nb5 Qb8
Relatively best was 14.... Qb6 when Stockfish suggests the critical continuation is 15.Bxe5 Nxe5, 16.Nec3 a6, 17.Re1 Rd8, 18.Rxe5 axb5, 19.d6 Qxd6, 20.Qxd6 Rxd6, 21.Rxb5 Rd7, 22.Rd1 (+2.78 /40). There are, of course, other moves for Black, but they also turn out badly.

Position after 14....Q(d6)-b8
15. Bxe5 ....
Again, simplest, but Stockfish suggests that even stronger would have been 15.d6 exd6, 16.Rc1 Ngf6, 17.Nc7+ Ke7, 18.Qd2 with various options.
15. ... Nxe5
Instead, recapturing with the queen would have given some hope to the a8-rook.
16. Qa4 ....
Setting up a discovered check. Also good was 16.Rac1, as played next move.
16. ... Nd7
17. Rac1 Kf8
18. Nc7 Nb6
19. Qd4 Nf6
20. d6! ....

Position after 20.d6
The isolated pawn has proved to be a valiant warrior, now threatening the devastating capture of the e7-pawn. Black's relatively best response would have been 20.... Qd8, when 21.dxe7+ Qxe7, 22.Nxa8 Nxa8, 23.Rc8+ Kg7, 24.Rxh8 Kxh8, 25.Qxa7 leaves White with an easily winning endgame.
20. ... exd6
This hastens the end.
21. Qxf6 Rg8
22. Nd4! Nd7
23. Nde6#
1 - 0

Final position
The Caro-Kann was for a long time viewed by many players as an overly safe and stodgy defence, likely to lead to a dull game. This examination of the Panov-Botvinnik Attack shows that that is not always a valid appraisal. There are also sharp lines available to Black, and the Caro-Kann is nowadays generally viewed more favourably. The Chess Opening Explorer on the website of 365chess.com ranks the Caro-Kann as the fourth most frequently played response to 1.e4, after the Sicilian (1....c5), the Classical (1....e5) and the French (1....e6). The statistically most successful lines for White in the Caro-Kann are the Advance Variation (3.e5) and the Fantasy Variation (3.f3).
The game shown above illustrates the potential benefit of an isolated queen's pawn. It took only a few inaccuracies by Black - in particular the too early development of the queen, and some further loss of time - for the White forces to establish a commanding position. But an isolated pawn, which can also arise in several other openings, particularly in various lines in the Queen's Gambit, can also be a liability, especially in the endgame. See, for example, the game Larwood v. Payne with detailed comments in our 2025 article Are Isolated Pawns Strong or Weak? The short answer to that question is that they can be either, depending on the disposition of the remaining pieces. Understanding how to use an isolated pawn, or play against one, calls for some study.
JK / 08.01.26
-
Tactics in the Opening
By John Knott
Contrasted with winning the First Division of the Sussex Chess League in the 2024-5 season, our First Team had a disappointing start to the current season, losing to Brighton and Hove 1 by 1:3, and to Bexhill 1 by 1½:2½. However, the situation has now improved by our 3:1 win against Crowborough, achieved by two wins and two draws. On Board 2, team captain Russell Granat was in good form, and won his game convincingly in 30 moves. Subsequently, our First Team drew 2:2 against Hastings 1, in an away match. So, although we have gained only three points from four matches, it is fair to say that we have so far not been able to field our strongest team for any match.
This is Russell's fine win in the match against Crowborough.
White: Russell Granat
Black: David W. Fryer
Event: Sussex League: Worthing 1 v Crowborough
Date: 1 December 2025
Opening: Four Knights, by transposition (ECO C47)
1. e4 Nf6
2. Nc3 e5
3. Nf3 Nc6
By an unusual route, starting with Alekhine's Defence and moving on to the Vienna Opening, we have now reached the starting position of the Four Knights Game, an opening noted for its high drawing chances, as indicated by Stockfish's evaluation of +0.03 at
44-ply..
4. d3 ....
The most common options are 4.Bb5, to which Rubinstein's ...Nd4 is considered to be the best response; and 4.d4, which after ...exd4, 5.Nxd4 may transpose into the Scotch Four Knights. The text move appears solid but is liable to hand the initiative to Black.
4. ... h6
More active was 4....d5, 5.exd5 Nxd5, when Black is somewhat better.
5. Be2 Bc5?!
Again, ...d5 would have been the more natural move, possibly leading to 6.exd5 Nxd5, 7.0-0 Nxc3; 8.bxc3 Bd6 with equality. (An Internet blitz game, discovered by Keith Homeyard, had gone 7... Be6, 8.Ne4?! (better was 8.d4) Be7, 9.Re1 0-0, 10.h3 f5, 0-1 (29) Kovacevic (2113) v Demin (2430) Chess.com INT blitz 2022.)
Position after 17.B(e3)xN(d4)

Position after 5..... Bc5?!
6. O-O ....
Instead, 6.Nxe5! - a key idea in a reversed position in the Vienna Opening (for which, see note at the end of the game) - 6.... Nxe5, 7.d4 Bd6, 8.f4 Nc6, 9.e5 Bb4, 10.exf6 Qxf6, 11.d5 Ne7, 12.0-0 (KFH) gives an advantage to White. In this line, an ultra sharp try by Black, 6.... Bxf2+, backfires after 7.Kxf2 Nxe5, 8.Rf1 0-0, 9.Kg1 d5, 10.d4 Ng6, 11.e5 (KFH) when White has a space advantage, the bishop pair, and has recovered the initiative.
6. ... d6
If instead 6.... 0-0, then 7.Nxe5! (the same idea as in the previous note) Nxe5, 8.d4 Bd6, 9.f4 Nc6, 10.e5 Bd7, 11.d5 Nxd5, 12.Nxd5 Bc5+? (better was 12.Re8) when although Stockfish gives an evaluation of +2.87/40, the high-level game Aronian (2732) v Gukesh (2687) Saint Louis Blitz 2025 (discovered by KFH) was drawn at move 64.
7. Na4 a6
Trying to sneak the bishop away to a7. More realistic was 7.... Bb6, when a capture would open the a-file for Black.
8. Nxc5 dxc5
9. b3 ....
In order to activate the dark-squared bishop on a useful diagonal where there will already be a target. Another idea was 9.c3, taking d4 away from Black's knight, while also giving more scope to White's queen, including a secure place off the d-file at c2.
9. ... Be6
10. Bb2 ....

Position after 10.Bc1-b2
10. ... Qd6
The alternative method of defending the e5-pawn also leaves White with the better position after 10.... Nd7, 11.Nxe5 Ncxe5, 12.f4! Nc6, 13.f5 0-0, 14.c3, when he will soon recover the piece.
11. Nxe5! Nxe5
12. f4 Neg4
13. e5 Qb6
14. exf6 Ne3?
Tempting, but Black should have settled for the retreat to f6. After the text move he has a strategically lost game.

Position after 14.Ng4-e3
15. Qd2 Nxf1
16. fxg7! Rg8
17. Rxf1 Bf5
Understandably, Black does not want the f4-pawn to advance with tempo to f6. The main alternatives, 17....0-0-0 and 17.... c4+, are not significantly better.
18. Qe3+ Kd7
19. Qe5! Qe6
20. Qxc5 ....
Also good was 20.Qxe6+ fxe6, 21.Bh5 (or 21.g4).
20. ... Rae8
21. Bf3 c6
22. Qa7 Qe3+
23. Qxe3 Rxe3
24. Kf2 Ree8
25. g4 Bh7
26. f5 Kd6
27. Be4 Re5
Black is happy to give back the exchange in order to capture the menacing g7-pawn.
28. Ke3 Rxg7
29. Bxe5+ Kxe5
30. f6 ....

Final position, after 30.f6!
This wins the Black bishop. Black can pick up the g4-pawn with his rook, but this would not affect the outcome. Black resigns. 1-0
Positions with similar features to those occurring after move six in this game can occur in several other openings, in particular in one variation of the Vienna Opening, where it is reached after the moves: 1.e4 e5, 2.Nc3 Nf6, 3.Bc4. Here, White has other possibilities, such as 3.f4!? in the style of Rudolf Spielmann, or the sedate 3.g3 favoured by Smyslov; but 3.Bc4 replicates the tactical possibility that occurred in Russell's game.

Position after 3.Bc4 in the Vienna
Here, a key plan for Black is 3,,,, Nxe4!?, when if 4.Nxe4?! d5, he recovers the piece with the better position. This was the reason why Alekhine stopped playing the Vienna.
However, a very sharp continuation for White after 3....Nxe4 is 4.Qh5, attacking the knight and also threatening mate, leading to 4.... Nd6, temporarily dealing with both threats and also attacking White's bishop.
Now, White has to decide whether to capture the e5-pawn, which is likely to lead to 5.Qxe5+ Qe7, 6.Qxe7+ Bxe7, 7.Be2 when in a symmetrical pawn structure he has a small edge by reason of the awkward placement of Black's d6-knight.
The alternative is to embark on a potentially wild line with 5.Bb3 when ... Nc6 (guarding the e5-pawn) allows 6.Nb5 g6, 7.Qf3 f5, 8.Qd5 Qf6, 9.Nxd7+ Kd8, 10.Nxa8 b6 - a line not for the feint-hearted, which has acquired the name Frankenstein-Dracula Variation.
However, after 5.Bb3 Black may instad try 5.... Be7, allowing 6.Qxe5, when probably 6.... 0-0 gives approximate equality. Nowadays the Vienna Opening is rarely seen - which, of course, may be a good reason for playing it, if you are well prepared for the complications.
JK / 10.12.25
-
Our Future British Champion?
By John Knott
One of our young members, Sidhanth Pai, who joined the Club in 2024, achieved a remarkable result in this year's British Under-12 Championship held in August at St George's Hall, Liverpool. He was competing in a field of 39 players under a Swiss pairing system over seven rounds, playing one game a day. Sidhanth scored three wins and four draws, producing five points out of a possible seven, securing third place behind two players who scored 5½ points. However, Sidhanth was the only player to go through the whole competition without loss.
After achieving draws in the first two rounds, Sidhanth next had the black pieces in a king-pawn opening.
White: Claude Samuel
Black: Sidhanth Pai
Event: British Under-12 Championship 2025, Round 3
Date: 5 August 2025
Opening: Closed Sicilian Defence
1. e4 c5
2. Nc3 e6
3. Nf3 a6
4. g3 b5
5. Bg2 Bb7
6. d3 ....
White, by his 2nd, 4th, 5th and 6th moves, has adopted a slow but solid development, having passed on several opportunities to open the position with d2-d4. Somewhat inconsistently, by putting his king's knight on f3, he has also blocked the possibility of playing f2-f4.
This has given Black a free hand to gain space on the queenside. White's pawn structure resembles that in the King's Indian Attack, but in that opening the queen's knight is more usefully developed to d2, from where it often proceeds to f1, h2 and g4, to participate in an attack on Black's king, if Black castles kingside.

Position after 6.d3
6. .... Nc6
7. O-O Be7
8. Be3 Nf6
This gives White the chance for the energetic response 9.e5, which it might have been a good idea to discourage by, for example, 8...Qc7. However, White misses the opportunity and engages in some ineffective piece shuffling.
9. Nd2 d6
10. Re1 Qc7
11. Qe2 O-O
12. Bg5 h6
13. Be3 Rac8
14. f4 ....
At last, some sign of aggression, but White's pieces on the d- and e-files are not well placed.
14. .... Nd4
15. Qd1 Nd7
16. Ne2 Bf6
17. Bxd4 ....
The best way for White to dislodge Black's knight would have been by 17.c3. After Black's reply to the move played he retains some advantage, but would have been even better placed by recapturing with the c-pawn, when play could have continued 17.... cxd4, 18.Rc1 Qb6! further supporting the d4-pawn and applying pressure on the diagonal leading to White's king (thereby preventing the freeing move c2-c3) while also severely cramping White's position.

Position after 17.B(e3)xN(d4)
17. ... Bxd4+
18. Nxd4 cxd4
19. Rc1 Nb6
20. c3 dxc3
21. Rxc3 Qd7
22. Qb3? ....
No doubt White was intending to follow with Re1-c1, but this is easily prevented. The square b3 would have been more suitable for the knight, after an exchange of rooks at c8.
22. ... Na4
23. Rxc8 Rxc8
24. d4 Qc7
Consolidating control of the c-file, and preparing to infiltrate the White position on the second rank. White's reply may have been with a view to playing the knight to e3, to guard the c2 square, but it is too late.
25. Nf1 Qc2!
The beginning of the end. Black now has a decisive advantage.
26. Qxc2 Rxc2
27. b3 Nc3
28. a3 Ne2+
29. Kh1 Nxd4
30. Rd1 e5
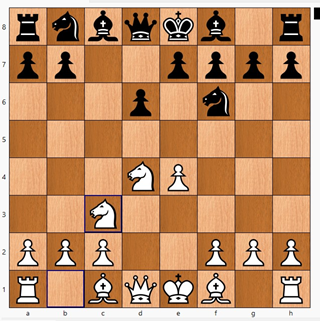
31. Rb1? ....

Position after 31.Rd1-b1?
White's sense of danger has entirely left him. Geometry plays an important part in chess, and a glance at this position should start alarm bells ringing. If the Black rook and the White bishop were not in their places, the solution would be obvious. How can Black penalise White for his last move?
31. ... Rxg2!
32. Kxg2 Bxe4+
33. Kh3 ....
Centralising the king by moving it to f2 would have been better, but would not have affected the outcome.
33. ... Bxb1
34. Nd2 Bc2
35. b4 e4
36. Kg2 e3
37. Ne3 Be4!

Final position, after 37.Bc2-e4
A neat finishing move. White is a piece and two pawns down and will be unable to stop the e-pawn from promoting.
White Resigned 0 - 1
For amplification of the point made in the note to White's 31st move, see further comments and an example in the 2025 article "Chessboard Geometry" on our website. It is really important to gain as full an understanding of the board as possible. Similarly, it is much easier to navigate in a busy town if you can visualise the road layout and if you know where particular shops and restaurants can be found. On the chessboard we have the algebraic coordinate system which enables us to identify and visualise particular squares, files, ranks and diagonals.
In the next round of the tournament Sidhanth had the white pieces, and played a very sharp line against his opponent's Sicilian Defence.
White: Sidhanth Pai
Black: Yueci Li
Event: British Under-12 Championship 2025, Round 4
Date: 6 August 2025
Opening: Sicilian Defence, Scheveningen Variation, Keres Attack
1. e4 c5
2. Nf3 e6
3. d4 cxd4
4. Nxd4 Nf6
5. Nc3 d6
In the Sicilian Defence there is much scope for transposition. By a somewhat unusual sequence of moves, a basic position of the Scheveningen Variation has been reached. Generally, an early e7-e6, where Black keeps open the options for developing his dark-squared bishop, introduces the Paulsen / Taimanov / Kan systems. To establish pawns at d6 and e6 Black will nowadays generally prefer to develop his queen's knight early, rather than the king's knight, to avoid the very line that Sidhanth now plays.
6. g4! ....

Position after 6.g2-g4!
The start of the so-called Keres Attack, named after the Estonian Grandmaster Paul Keres, who popularised the move in the 1940s. The idea behind the move is to advance the pawn to g5, dislodging the f6-knight, which is a key kingside defender and also has an influence in the centre of the board. Black will usually respond with h7-h6 to discourage the further advance of the pawn, but Sidhanth's opponent simply continues his development.
6. ... Nc6
7. g5 Nd7
8. Be3 a6
9. Rg1 Qc7
10. Rg3! ....
A flexible move, strengthening the third rank and being able to swing rapidly to the queenside, where it is now likely that Black's king will end up. This and White's next two moves could be played in various orders.
10. ... b5
11. a3 Bb7
12. f4 O-O-O
13. Qd2 Kb8
Moving the king to the b-file is usually a sensible precaution after queenside castling, for both White and Black, and is particularly so where, as here, Black's queen is also on the c-file.

Position after 13....Kc8-b8
14. O-O-O ....
This is perfectly logical, as the king will not have sufficient cover elsewhere. Also possible was the immediate capture of the b5-pawn, which White undertakes next move. Play might have continued 14.Bxb5!? Nxd4, 15.Qxd4 Nc5, 16.Be2 e5, 17.Qc4 exf4, 18.Bxf4 Ne6, 19.Qxc7 Kxc7, 20.Be3 after which White will castle with an extra pawn and the better development.
14. ... Nb6
15. Ndxb5! axb5
Avoiding the capture by 15. ....Qd7 is liable to transpose to the game after 16.Bxb6.
16. Nxb5 Qd7
17. Bxb6 Rc8
18. Rb3! ....
Showing the merit of White's 10th move. Also strong was 18.Rd3, applying further pressure against Black's queen. Even at this stage of the game Black's (original) kingside is largely undeveloped.
18. ... Be7
19. Kb1 h6
20. Nd4 ....

Position after 20.Nb5-d4
20. ... Nxd4
21. Bxd4 Bd8
22. Ba6 Rc7
23. Bxg7! ....
Excellent. Playing on both sides of the board.
23. ... Rh7
24. gxh6! Be7
There are now several ways to finish the game. White chooses to clear the route towards the weak a7-square.
25. Bb5 Qc8
26. Bd4 Bd8
27. Qa5
Black resigned faced with early mate or severe loss of material.
1 - 0

Final position, after 27.Qd2-a5
If Black had been stubborn, play could have continued 27. ... Rc5, 28.Qb4 f6 (at last, activating the h-rook), 29.Ba6 Ba5, 30.Qa4 Qc6, 31.Qxc6 Rxc6, 32.Bxb7 Rxb7, 33.h7 Rc8, 34.Bxb7+ Kxb7, 35.Bxf6, and Black will have to give up his rook for the h-pawn.
In the next round Sidhanth also won, and then drew the remaining two games, for a final score of +3, =4, producing 5 points; a very creditable performance.
Sidhanth, whose favourite subjects at school include maths and science, was eight years old when he learnt to play chess, which attracted him as an interesting and unique game. He initially received guidance from Dave Graham, and more recently from Chris Jones. He clearly has a bright chess future ahead of him.
JK/09.12.25
Our Future British Champion?
Menu
Tactics In The Opening
Dynamics of King Pawn Openings
Vienna Opening
Double Attacks in Chess
bottom of page